**Please see the updated post on how to paint furniture. The paint I mention is no longer available, and you can find the replacement for that here.
Here we go.
Start out with a piece of furniture covered in years of build-up. I bought this TSP degreaser, and it worked like. a. charm. It was $6.00 at my grocery store.

I walked into the paint store and told my paint guy, “I don’t want to do anything to this piece of furniture. I don’t want to sand it at ALL.” He said, “You’re lazy.” Not really. He told me to buy this stuff. It’s got a pretty rough surface to it so that it can grip the paint.

Then, (shocker here) I turned to my handy dandy Ben Moore Low Lustre Metal and Wood paint. The SAME quart that I used on this and these. (Note-this is not the actual can I used. This is a different color.)

I have two secret weapons. The first is my paint (swear by it). The second is a foam roller. I buy the foam rollers at Wal-Mart for a couple of bucks. I cut in the trim and curves with cheapo foam brushes from Hobby Lobby, then I roll on all the flat surfaces with the foam roller. Between the paint (which smooths out better) and the roller, there are no streaks, brush strokes, etc. It looks like it’s been sprayed on.
![IMG_6306_thumb[3]](http://lh3.ggpht.com/_HzpqGt5NyaY/Ste-4ZjCWMI/AAAAAAAAEGo/RWu7jh2YnPU/s1600-h/IMG_6306_thumb%5B3%5D%5B6%5D.jpg "IMG_6306_thumb[3]")
I’m quite careful about checking for coverage and lines as I go, but I don’t do anything special outside of that. I just keep rolling lighter and lighter until it’s completely smooth.
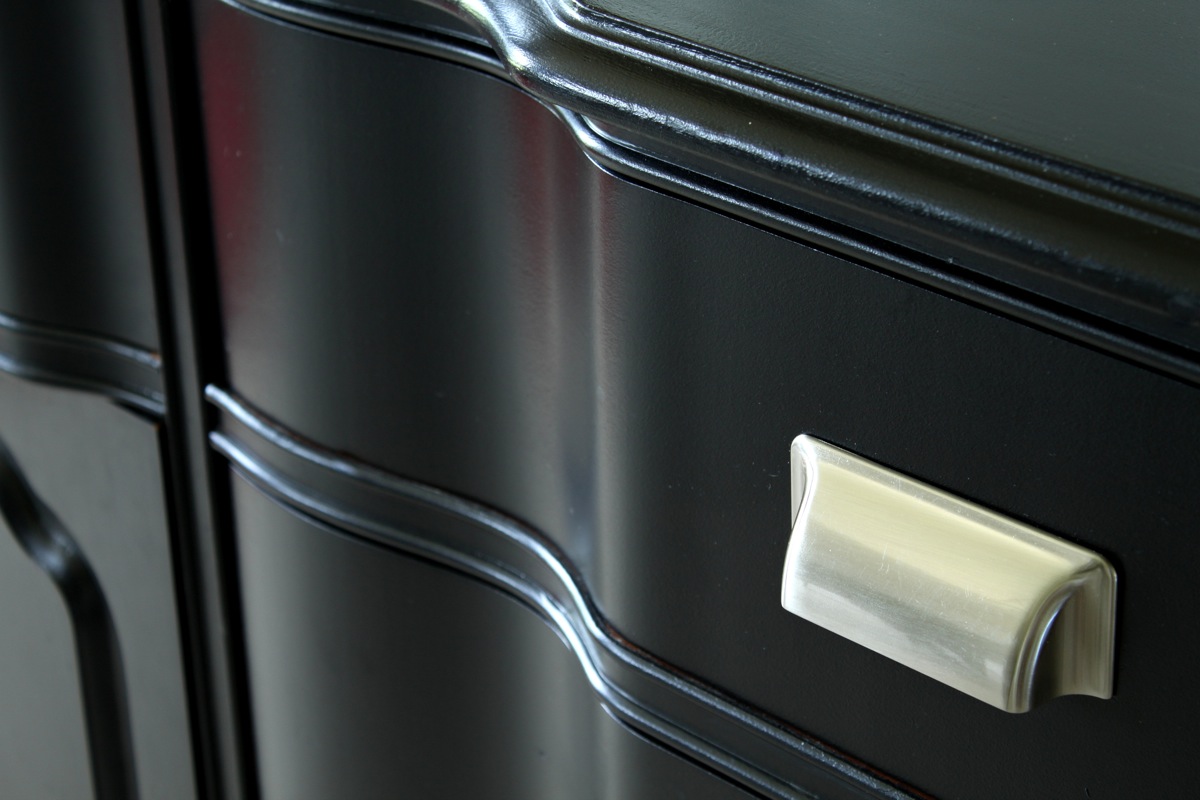
Just in case you’re doubting the smoothness this provides. Nice, right?
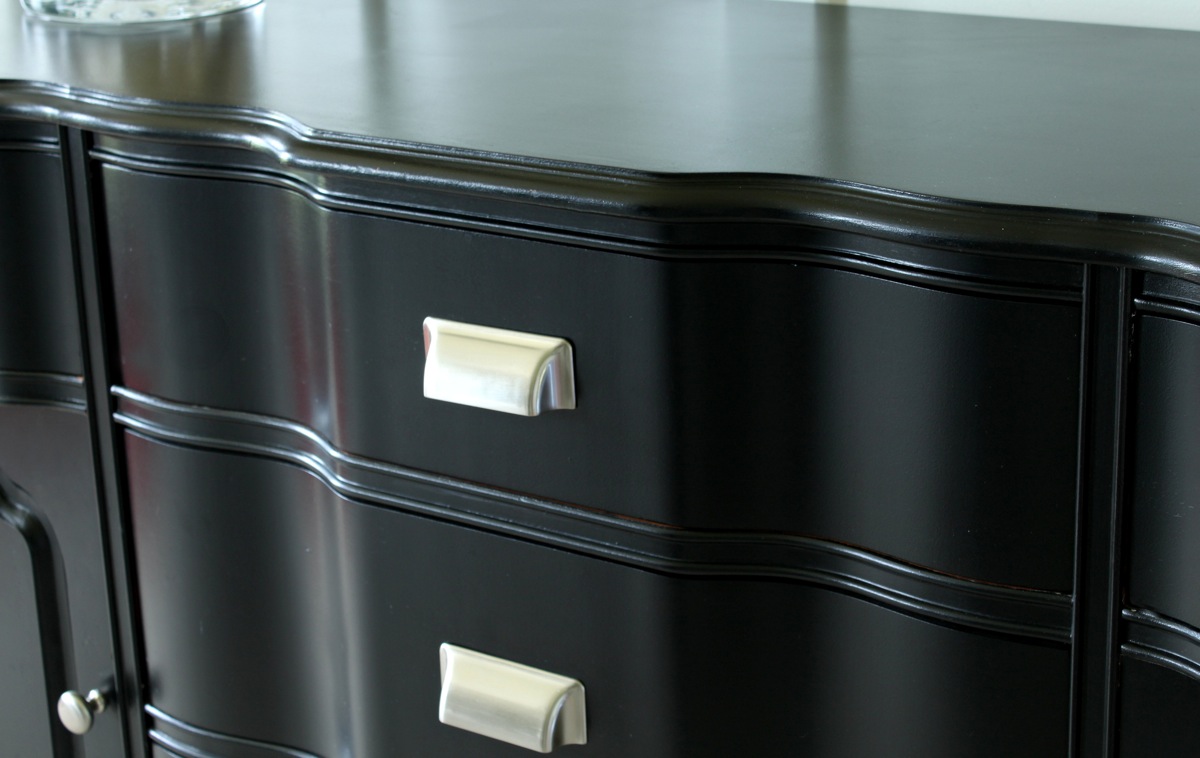
So…just to be clear. I did NOT sand this thing. I wiped it down really well with TSP cleaner, used the special primer (also with a foam roller), and painted a couple of coats of black paint on it. That’s it. No special finish over it.
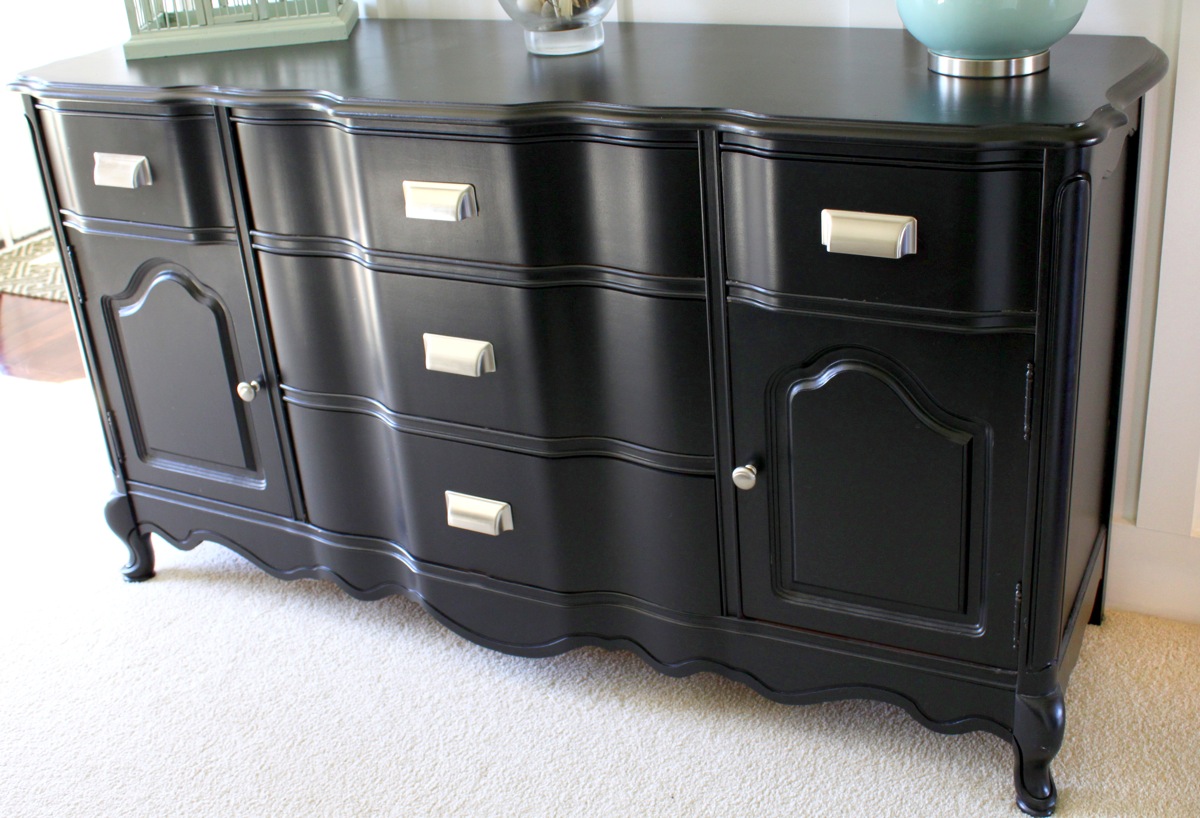
I almost forgot. I purchased the hardware at Lowes. The hardest part about this project? Waiting for it to dry!

Latest posts by Chris (see all)
- Tartan Plaid Bedroom - December 1, 2021
- Favorite Things 2021! - November 24, 2021
- Our Christmas Wishmas Tree - January 3, 2021


Thanks for the tutorial, can you tell us where you got the hardware. I LOVE them!
The Zinsser primer says not to use with TSP.
Sorry, Anon. I've added it to the post!
This looks amazing. I absolutely hate sanding. I have a couple of furniture painting projects to do and I am certainly going to try it your way. Love it!
Thank you
This is gorgeous!!! I am redoing our bedroom set and using this as a guide. Did you have to do anything to the hinges on the doors or were they already black? My piece has bronze colored hinges and I’m not sure of what the best way to paint them would be? Any advice?
That looks incredible!!! I would be super proud of that piece if I were you. I love it!!!
Yay! Great job and thanks for the info 🙂
No sanding? Be still my heart 🙂
thank you so much for the info I was just going to ask what kind of paint and brushes you used!!
Oh that's just a gorgeous piece of furniture!!!! lucky woman…
You are the best! I'm am archiving this post to come back to when I stumble across the next piece of furniture begging to be refinished. Thanks so much!
This looks fabulous!!! I just did a table and used that handy "smooth finish" roller–worked like a charm!
Chris…that is THE most amazing piece of painted furniture I have ever seen! What a gorgeous finish. I am stunned that it took so few steps. I am buying that exact paint tomorrow! Thank you for sharing the details with us.
~Amanda
THANK YOU! you're super nice to oblige us with the info! Oh, and have you done anything with those orange chairs yet??? I sure wish you'd decide to re-upholster a wing-back…i inherited two extremely ugly ones and wish i could muster up the confidence to do it myself…we'll see. 🙂
meagan
Can you tell me where you got your BM black paint? I've looked all over and I can only get it in high gloss.
Thanks
Moontastic10@msn.com
yes I want to know too!!
Michellethompson79@comcast.net
I’ve also gone to Home Depot, Lowes, Sherwin Williams, Rodda, Ace, and several other local Seattle paint/hardware places with no luck…I have had several say they have something similar but it’s either gloss or “not as heavy duty” in their words…WHERE did you get this stuff?! Also would you mind sharing how much you paid for it? I’m doing ALOT of furniture pieces and have been quoted $50 to $75 for 1 gallon of “something similar”…does that sound right??
I can’t find the paint either….where did you get it ???/
I work in a Ben Moore store. They are all independent so you’ll have to go to benjaminmoore.com and type in your zip on their store locator to find a retailer.
No stores in DFW area carry this paint anymore either, but they suggested using Benjamin Moore Advance waterborne interior alkyd in a satin finish (base 4). Covers very light but “fills in” as it dries. It took 2 good coats to redo my chairs. Looks awesome so far. Just skeptical that I won’t need a top coat or sealer. I’ve had to touch up a few that I bumped together and the paint chipped off. *crossing fingers* It says that it will “harden” over time. I’ve never heard of this but still hoping for the best.
I have also heard that the BM Advance is good. I clearly need to visit my paint guy soon. They still carry the Metal and Wood, but I need to get some clarification for all of you. I’m sure it’ll turn out great!
Did your paint version adhere okay to your furniture? It’s only been 2 1/2 days, so maybe mine’s not dry all the way, but I can scratch it off with my finger nail. 🙁 I actually sanded mine down a little just to smooth out the old varnish first…
What color did you use? I bought BM paint and was so excited and when I used it, it looks gray. I hoped it would darken as it dried but it’s still gray. My husband is not going to let me spend 65 on another gallon of paint:(
After a lot of phone talking I finally got an answer about the BM black paint that has “disappeared”. Apparently BM changed the label & name a little bit 🙂 Now they carry it as Ultra Spec 500 http://www.benjaminmoore.com/en-us/for-your-home/paint-products/ultra-spec-500-interior-paint?lang=en_US&role=H#s_pt=use_paint&piSheen=537&advs=0&tab=2
It does come in black (a true black, not gray or any other funny names) & adheres to metal & wood just like it did before. It runs about $50 for a gallon in my area so I will be buying it to redo my childhood bedroom set for my daughter 🙂 Hope this helps & good luck!
Thank you for the info erikadawn76!
Thanks for the great tutorial, it is a beautiful piece of furniture.
Looks awesome. Thanks. We are moving soon and i get to redecorate so I bookmarked it!!
I will be buying that primer tomorrow. I have my chair project that must get done this weekend and I don't have the time or the patience to sand them. Thank you for sharing that. I'll bet the hardest part was waiting for it to dry! Again, it came out fantastic and I just love it. I'll be glad if my chairs come out half as good!
Looks great! I wish I had decided to paint this table for my dining room. Instead I opted for re staining & greatly regretting it right now.
So cute! Thank you for posting this, it's very helpful in trying to figure out a way to bring new life to the hutch in my dining room 🙂
Oh that looks increadible! I missed the earlier post but went back and read it. I love the way it turned out. I would love a piece like that in my bedroom!
Thanks for sharing!
Oh hello?? How did I miss this?? Freaking awesome, it is!! High five for no sanding!!!!!!!!!!!
Love it. Glad you got the finish you wanted. I usually sand between each coat of paint just to ensure that beautiful to the touch finish.
Wow!!! It's looks like such an expensive piece. I love it. I even had my hubby over here checking it out. He rolls his eyes everytime I paint a piece of furniture. He prefers the real wood look. It's absolutely stunning. Thanks for the how-to.
I love it…beautiful piece of furniture. Thanks for the info 🙂
Thank you for sharing! I've put off refinishing items because well the refinishing part (stripping, sanding etc) This is so much easier!! I'm so excited. Thanks for sharing!
Is that NOT the truth…I can barely let things dry…I get to excited!
sandy toe
Wow, you are my hero! Thanks for all of the helpful tips! 🙂
I love you for this tutorial~seriously, I don't think I've ever seen a piece made over look so lovely and smooth. Incredible!
Thank you for sharing your secrets!
One of my favorite things about blogs like yours is the generosity of spirit that bloggers show. You never get a "Ha, ha! That's for me to know and you to find out" kind of attitude–instead, you get a very helpful "Sure I'll tell you what I did" attitude. I love that, and you epitomize it.
Congratulations on your wonderful new piece!
What can I say except thank you so much for sharing!!!
Thanks for the info! 🙂
Wow! Your buffet is gorgeous!! Thank you for all the tips!
Thanks for the tutorial O.W.G. (oh wise grasshopper). I just wrote down all of the supplies and once I have the dough I'm totally buying these products!!!
Perfect! The details to the results are great. I will be investing in some of that primer stuff. Sandy is no fun for me either…since I have no place to do it in an apartment.
All my questions answered. Thanks!
I just discovered your blog and I LOVE it. I'm now a follower! I had fun looking through your old posts.
This is gorgeous!!
What color paint did you use?? I need to paint a coffee table!
Thank you!
Lou Cinda 🙂
Soooooo cool! I'm so doing this!
I so wanted to know too? YEAH' now I know! ONE WORD FOR IT…. "STUNNING"
Yeah – the waiting to dry part would be the hardest part for me too!!!
BEAUTIFUL! I have a question. I have a great piece of furniture but it is made with the yucky fake wood plastic veneer type stuff. Would your recommended primer work on that? My husband keeps telling me no pait will adhere to that surface. Help me prove him wrong 😉
Thanks for the great tips. I have some things that need to be painted too. Your buffet looks brand new right out of pottery barn. I'm definitely following your steps on my next paint project!
I want it! You are amazing!!!
Wow, what a great job. Thanks for the tutorial.
This is beautiful! As always, great tutorial!
It's beautiful! You did a fantastic job. Thanks for the tutorial!
Roeshel
Thanks for all the info! This looks GORGEOUS!
It looks gorgeous! I really enjoy your blog. It might be my new favorite! 🙂
You are the best! Thanks for the tutorial.
I noticed that the primer is oil based, while the paint is latex.
Having to undo all of my past learning about painting (latex cannot go over oil), I am so releived to know that it works.
Mel
Thank you, thank you. I'm inspired now to actually finish some of my wood projects since I know they'll turn out great!
I am very happy for this!!! As someone who is absolutely creeped out by sandpaper/sanding, this just might save me!!
I spend far too much time waiting for my bf to get around to sanding something for me… I owe you big time!!!
Beautiful! Thanks for divulging your secrets!
That piece is really amazing. It looks really elegant. You did a very good job. Thank you for sharing this.:)
is there a "before" pic? I love this!
Brilliant! Anyone who can figure out how to cut out the sanding process and make the finished product look as PERFECT as you did is just RAD! It's not laziness..it's brilliance. Why waste your time if you don't have to!
I LOVE SHORTCUTS. I've added this on my list of "to do" projects on my blog. Beautiful and hard to imagine that remarkable sheen. I really love your blog!
Jan
That is absolutely fantastic! I'm really amazed at how it was done and the finished result. Thanks 320 Sycamore for pointing me towards your blog. x
You've inspired me, thanks!
Thank you thanks you for posting the how to!! I just bought a headboard for my daughter and have no clue how to redo it! You helped me loads!!! I can't wait to do it! and…I got it for free! so maybe say a prayer for me and here I go!! LOVE yours by the way, i'm a tad jealous because that's what I need badly in my small house of chaos!
I just purchased a thrift store piece almost EXACTLY like this! I'm definitely getting this type of paint, thank you so much for the tips!
One more thing, what colour paint did you use on your buffet? AND looking back at the photo I think it is the exact on I have! If this works as well as yours did I'm considering doing the dining room table and chairs!
Shut UP!! This is FABU! Gorgeous, stunning, jaw-dropping transformation, C.
Thx so much for recommending this paint (way back when in your door post, too). I used it for our front door and it provides THE best finish!!
Oh I wish I had read this a few hours earlier. I am painting a dresser and already bought the paint.
I am unfortunately going to have to sand it.
Oh my gosh, is that gorgeous!!! Looks like it's straight from some expensive show room!
I'm so inspired I headed off to Home Depot yesterday. The neighbors were casting off an old dresser and I can't wait to give it a go. Thanks for sharing.
Chris, Thanks for the directions on the black paint job. Went to my Ben Moore store and they were out of TSP degreaser, but ordered me some. Also, they have the Zinsser Cover Stain and primer.
I can't wait to get started on my bookcase/tv piece.
I'll get to it next week and send you a picture if I don't mess up.
Thanks for the recipe!!
wow, that piece is just beautiful, it looks so professional, I love it, I am now a follower of yours and I will be back for more, come for a visit
This is really really amazing. I say a Broyhill dress in this second hand store for $65 this week. I think I am going back to get it now. You have really inspired me.
I have tried this and I am ever so thankful for your post. Benjamin Moor where have you been all my life!
Actually I should be thanking you b/c without the post on your project I would still be using a paint brush instead of foam roller.
Brilliant!
Just wanted to let you know I linked to this post. You inspired me to paint my dining room buffet. . the paint worked beautifully . no cleaning or priming required. I just went for it and love it!! Here are pics if you care to see and where I linked to your post:
http://theintentionalhome.blogspot.com/2009/11/how-tos-of-painting-my-buffet.html
Thanks for the detailed how tos and the inspiration. I am glad I found your blog.
Wow — I'm in trouble. I went to add this to my projects list, and when I did, I found out it was already there. That list is getting way too long. The wierd thing is that I've looked at so many blogs, I don't even know when I'm reading the same article twice (haha). It's a marvelous tutorial, and definitely on my TO DO list (like twice).
Thanks for sharing. I've seen shabby chic white painted furniture revamps…but you've shown me the potential in other colors and finishes.
You've inspired me to finally tackle the refinishing of a 1970s Ethan Allen end table my parents gave me ages ago. I used the cleaner and primer you suggested and planned to get the BM paint, too. When I applied the primer this morning, though, I was surprised how much I had to do with the sponge brush. The legs are turned and there are lots of nooks and crannies I can't get to with the roller. Do you think spray paint would be a better way to go? If so, any suggestions on the brand? Would love to benefit from all your experience! Thanks so much for your great blog — love it!
Hi there! What a BEAUTIFUL job you did on your buffet…jealous! I have recently inherited my grandparents dining room hutch and am going to paint it black, but I had a quick question for you. Like you, I have NO DESIRE What.So.Ever. to sand this thing. I want to use the same applications that you did on your hutch, but I am wondering what type of finish it had prior to you starting your project. My hutch is solid maple with a glossy finish on it. Again…reiterating…I DESPISE sanding!
Any help would be great! Happy Holidays!
~Erin (erin-patneaude@comcast.net)
I am absolutely shaking with excitement because I came across your tutorial when I googled "how to paint furniture black." I bought THE EXACT buffet that you show in the picture at a second-hand store yesterday!! I have looked for months for a piece the right size, but could find nothing that I loved for under $1500.00 – I got this one for $100 – YEAH ME!! Thanks for all the tips – I will be following them to a "T"
I love love your dresser. I love the handles you put on it, it really adds to the beauty of it.
After seeing your tutorial on this it really has inspired me to repaint a few things and after we sell my daughters other car so i can have a larger workspace then i plan on repainting my dresser and dining room table.
Hi Chris, I have a solid wood dark oak bunk bed that I want to paint white for my girls bedroom. I called three different Seven's paint stores in the GR area and got three different answers on what to use. I also went to Sherwin Willaims. Now I am confused. My biggest concern is I want a durable finish that will paint on smoothly. The bunk bed has lots of spindles so I will need to use a brush and a ladder that will get a lot of use. How is the Cover Stain primer to work with? I have read conflicting reviews. Have you tried the zinsser 123 primer? Any advice? maybe I'm over thinking it :)Thanks a bunch!
Can anyone let me know if B Moore still makes this product? I can't find it. I find something similar with Impervo rather than Ironclad.
Thanks
Paul
Truly, thank you so much for your help on this type of project. What color is the paint? I cant wait to start checking out ur blog regularly. You are a true artisan (the smart kind who doesnt care to waste time and energy, I love it!)
Thanks,
Annette
I am trying to get the look where, after sanding the black you have red showing through on the edges of the furniture. I painted the whole piece red with Benjamin Moore low lustre oil based paint, but when I sanded it to smooth out the dust, etc. it looks pink instead of red! Now that I have painted it with oil, I don’t think I can put on a top coat of latex. Also – I want that red showing through. Anyone know how to do that? Thanks!
that is absolutely amazing! I’m totally going to try this!!!
I am so doing this!! What color of black exactly????
I have got to know I want to start tomorrow!! 🙂
It’s just a pre-mix black, Michelle. It’s already in the can, so you don’t have to have it mixed or anything! Good luck!
did you use anything after painting it to protect it? It looks beautiful!!
Would this be safe to do on a baby crib? If baby were to “gnaw” on it would the paint come off in thier mouth?
I would definitely ask a paint professional before doing that, Crystal. While it’s a very durable paint, I don’t know that it’s baby safe. Good luck!
This is exactly what I want to do to my dining table… As a super-beginner at all things fixer-up, I’m wondering if this would be safe (non-toxic, etc.) to eat on, if I should add poly or something over it to protect it from dings (and art projects).. Any advice?
With it being a dining table, I would add some poly (oil base) over it. My paint person says it’s not necessary with this paint, but dining tables get a lot of wear and tear. I think it would be safe. You wouldn’t need to worry about yellowing of the poly since it’s a black paint. Again–NOT a professional here. I always seek guidance from my paint guy just to make sure. I would advise that. 🙂 Good luck with it, though! I think you’ll love it!
I was just looking at my ugly oak staircase today thinking that I wish I could paint it black but sanding it all would be a P.I.T.A. I’m considering this but do you think I should just use the cheapo foam brushes? HELP!
I just want to double check before I buy and try this. You used an oil based primer and a latex paint on top? I know my Ben Moore clerks are going to question that. I just called them and they said they only have high luster but are going to check and get back to me. I somehow doubt I will be able to find it here in Canada.
I have been very curious how to achieve that look. Thank you you for sharing.
Hi Grace.
Because this is an oil-based primer, you may apply the latex paint over it. Most people stay away from painting a latex over an oil-base PAINT. I find that my preferred stain/odor blocking primers are oil-based anyway. While I’m no professional, I will say that it works. I have a good relationship with my paint guy (from a Ben Moore store), and he recommended it. I will add that if you properly prepare it, you CAN paint latex over oil-based paint. It’s just not recommended if you can avoid it. Good luck!!
Thank you. I apologize but now I am confused. You used the oil based primer and latex low luster enamel for wood and metal in black or were both the primer and black enamel oils?
Thanks again.
Grace.
That’s ok! The primer is oil based (the can is in the picture), and the paint is latex low luster (in black).
Many thanks.
Do you think that this method would work for painting cabinets? I keep wanting to paint mine black, but really don’t want to sand them, hence the reason I haven’t done it yet. This may be the solution…
I love how your buffet turned out–so much that I’m going to use this paint on a storage bed I am completing right now. I have a question about the primer–did you use the primer in white or did you tint it? I know on walls they recommend using a tinted primer under a dark color, but wasn’t sure if you did that or not…I’m hoping not because I have white primer here already 😉 I didn’t want to have to paint a zillion layers of the black because I used the white primer. Thanks for the great post!
Oops–I looked around your blog for more info on the buffet and saw the pictures of the primer in white. Disregard my last comment/question that’s awaiting moderation about whether or not you tinted the primer since the final color is black…
Thank you. You just saved me a sanding headache. I’m a first timer here and a first timer attempt to redo my sons old beat up dresser super excited to find this and all the help you are awesome… off to go snoop some more on your awesome blog!!! you are amazing!
I have the EXACT same buffet. I can’t wait to paint it now! You did an amazing job. How is the top holding up? I was told it would be hard to get paint to stick because of the slick surface. I was thinking of wallpapering the top instead. Really awesome. 🙂
Oh my. I’ve had NO issues with the top surface. I change it out constantly with decorations, and I don’t have a single scratch yet. I DID paint my wall too close to it, and I got white spots of paint all over it. SO bummed. Now I have to sand them down and re-paint, but that was on me. 🙁 Go for it!
OMG, I am redoing the top only on my built in desk in black. At first, I used a quart of high gloss enamel in black. But I had messed up the primer when it was dry and didn’t think it would be a problem…it was…then I saw this post on PINTEREST, and called my paint store for this black. I got the LAST quart. They said they are discontinuing it? Is that true? So I rushed over, bought stripper as well, and spent all day stripping the paint off. Last night, I applied this paint over primer, and I love the color but the finish has a weird feel to it. Does yours? I made sure that all the dust was removed, it just feels like there is a little texture. And your pic doesn’t look like mine. I did buy a can of Poly to go over it because I do not want to have to touch up all the time, since we will all be using that desktop for computer use. Will the Poly smooth out the texture?
Found the paint at a Benjamin Moore retailer (Creative Paints here) and they changed/updated the product label. Guy there told me it’s now called Super Spec (maintenance coatings) D.T. M. Acrylic Low Lustre. They had one can like what is shown above (only in Deep Bronze), but told me this was the same product. Hope he’s right! I’ve already painted my dresser!
I checked today, Stacy. My paint guy said that the bases are still available. Since I only use the “black”, it doesn’t affect me. It was just their extended colors (mixes) that are discontinued. Hope that helps.
I saw your tutorial and went out and bought myself a piece of furniture to paint. I can’t wait! THANK YOU!!!
I bought the Benjamin Moore metal and wood paint BUT on the back of the can, it states there is a primer in the paint. Did your black paint have a primer in it? What should I do?
Thanks!
Hi Chris, Thanks so much for this post. Your furniture looks beautiful and I thank you for sharing your techniques. I’m misunderstanding something, though. (And anyone else feel free to clear this middle-aged brain of mine.) I’m confused about the paint and the primer. At the top of the blog I thought you said that you used the Zinsser primer, but on October 15th you say you didn’t prime before painting. On September 19th you said, “The primer is oil based (the can is in the picture), and the paint is latex low luster (in black).” But on September 18th you said, “The paint I used on the buffet IS oil.” Is it just me, or aren’t these statements contradicting each other?
Thanks!
My apologies, Carla. Whether I prime or not is based on the project I do. I did prime the buffet, but I did not prime my barstools or back door. Priming is NOT needed with this paint–that is what I was trying to get across. As for oil or latex, perhaps I misspoke. The Benjamin Moore Metal and Wood paint I use now is LATEX. With so many projects and variations of paint, who knows how that went. 😉 I will go back to the posts and clarify for anyone else that may come along. Thanks so much!
Ben Moore paint is the BEST. I painted a vanity with it 5 years ago and it only has one tiny chip that was totally my fault. Hope yours holds up as well.
HI Chris: I live in Canada and they don’t have the BM metal and wood paint any more. Do you happen to know if it is called something else now. If yes, what it is. Also, what is the color number that you used?
When I used a roller, very tiny bubbles emerged. Did you have the same thing and then they go away when they dry?
(I am still a little confused if you used a primer and if the black paint is latex or enamel)
Thank you.
Hi Chris, I just loved this project! And while I have my own craft project blog, I have a blog I use to highlight my FAVORITE projects from bloggers, and you are featured on today’s post! This was just beautiful, and I was so excited to see you come back to revisit how you made it happen. It’s at http://craftingharmony.com/2011/10/27/museum-quality-buffet-table/ …I hope you enjoy the feature! Thank you, Lori
Gosh, Lori! Thank you so much! What a nice feature! I really do appreciate it.
Did you put any type of protective clear coating on this piece?
I’m in the process of doing this paint job on my daughters old nursery furniture. I’m not sure if the furniture is made with real wood or not, I’m guessing no, because I had originally wanted to stain it a darker color (It’s a honey/blonde color now), but I sanded a spot and tried and the stain did not take. So here’s where I’m at now. I had on hand some Zinsser primer just like your showing in the post. Yesterday I took some foam brushes and a small foam roller to prime the crib. BTW, this furniture has a glossy sheen to it. After I got everything primed on the crib and it dried, I noticed that it has a rough texture to it. Do I need to sand that down before I paint with the black BM, and do I need to have 2 coats of the Zinsser primer, or will 1 be enough?!?! I’m so scared to mess this furniture up! This set is 4 years old, it was my daughters and we saved it and are now expecting another baby in Feb 2012. I can’t afford to go out and buy new nursery furniture so I’m hoping this will work!!!!!!!! Any suggestions?????? Also, what did you use to paint the black on with? Any particular brushes, rollers???? Thank you so much!!!!!
Hi Chris! The paint job on the dresser is amazing, and myself just like all the others are trying to recreate that with my guest bedroom furniture. I have all the supplies except the BM paint. I am from a small town that only has a Lowe’s and 1 Ace Hardward neither of which carry BM. I checked the BM website and couldn’t find a low lustre (only high gloss). Should I just call around when I go to a larger city to do my shopping or is there a substitution. We do have a Sherwin Williams in town. Thanks for the input in advance. Again very nice job on the dresser!
Ginger, I’m running to my local paint store tomorrow to ask about this. I’ve had MANY issues/questions from reader about it, and I want to make sure I pass on the right information. I’ll let you know as soon as I find out! Thank you!
Thanks for the info. Your buffet looks awesome! I found a dresser and have followed your steps and do not have the smooth surface at all. I did the primer and 1 coat of paint. After the primer I had a rough, not smooth surface. I went ahead and did the 1 coat of paint and still the same, rough surface. Not happy with this result at all. I noticed Tasha had the same issue. I am using the foam rollers, and the little foam brushes as well. What can I do to make this smooth? I do not think adding another coata nd another coat and going over and over will help. What are your thoughts? Thans
Brenda, I have heard this from some other readers. I’ve painted so many pieces of furniture with the foam roller, and I just don’t get the roller marks. As I roll it on, I make sure to roll lighter and lighter until I just barely run it over the surface. Could it be that you’re pushing too hard? I might also suggest that it’s the paint you’re using, but I’m not convinced. I use BM the most, but I have been known to use some cheaper paints on smaller projects. You could try adding an additive such as Floetrol to help “relax” the paint a bit. That might help?
Thanks Chris for the info! I believe it either is the primer or the roller. This is where it started. I did read somewhere that maybe to sand lightly between each layer. I might give this a try before putting on the 2nd coat. I just want that ‘nice’ look and not rough. What is strange is that where I used the foam brush, it is smooth. Guess, I could be using a brush, once I have it sanded down. I didn’t think that I was pushing too hard, but this will be something to make sure I don’t do it again. Thanks, Brenda
Ya I too loved the info shared with us and so pretty furniture you have.
thanks
For those looking for the paint you can find it at any Benjamin Moore store or go to their website to find a place in your area that sells it. The original brand name has been changed. It is now called Super Spec, D.T.M. Acrylic Low Lustre. The manager said it is the same exact thing and it can be made in to any color, but they do have the black pre-mix. Hope that helps.
Thank you SOOOO much, no wonder I couldn’t find it anywhere!
Hi ! Love your blog – lots of good info – I know this is an older post – but I was reading on Rustoleum’s website about their Zinsser products – and it said NOT to use TSP to clean your item. It didn’t say why. This is the link: http://www.rustoleumibg.com/images/tds/ZIN_TDS_BE_123%20with%20MPI_10_15_10.pdf
I don’t kknow if it is different for the oil-based primers, I only read this one for the 123 water-based primer.
Just thought I’d pass it on.
Best,
Tracie
california girl
This is great!!
Just what I was looking for – simple.
Thank you so much for sharing!
Thank you so much for posting this! I have some old furniture I want to paint black and I swear you’re picture on Pintrest was the first thing I saw! This looks so simple…thank you so much!
I realize that this thread is old, but I was so impressed with the results that I went today to purchase everything I needed to paint a bookshelf.
As of Dec. 2011, the (exact) black paint referenced is no longer available at Benjamin Moore – they’ve RE-NAMED it and it is available in their industrial paint line! Just thought I would let everyone know.
Also, when I told the salesman that I was purchasing this paint to achieve the ‘Pottery Barn’ look he said, “Well, that makes sense since Pottery Barn only uses Benjamin Moore paint!”
Thank you for posting that, Karen. It has changed. And you’re right–Pottery Barn uses Ben Moore. Great, eh?
Karen can you please let me know what the name is for the black paint in the BM industrial paint line? Is it the Super Spec DTM that a poster mentions above? I have a dresser I want to paint using Chris’ method and would like to get that nice Pottery Barn black look for it. Much appreciated! Chris – love the piece you painted! You use the foam roller when you use the Zinsser paint as well as for the BM paint? How many coats of the Zinsser do you think I would need for a clean (and not sanded down) dresser? Thanks! Very excited to paint it this spring. Mary
I use the foam roller for all applications, Mary. I only applied one coat of the primer. Good luck!
Chris, your piece is AH. MAZING!!
With that being said, I bought the BM paint (as others have mentioned it’s called something else now) they only had oil base at our BM store. Hubby thought oil base would actually hold up better so we went for it! We didn’t use primer and have a pretty smooth finish. But… the least little thing scratches it 🙁 It’s a 10 ft. long buffet with 16 small drawers that hubby built and I sanded all the edges, ALL the edges! So painting it over will have to wait for another day.
Whatcha think? Maybe should have primed bare wood? We did use several coats. Thanks!
Did you seal it after painting? There are various ways to go–rub on, spray, etc., but I would definitely seal it. I never sealed my barstools, and they haven’t scratched yet. What are the chances?? However, I would definitely recommend it. I hope this helps!
I’ve been trying to hunt down this paint, and it’s been a needle in a haystack to say the least. No one in town (Phoenix) sold it. I finally found the “renamed” paint here:
http://www.worldpaintsupply.com/benjamin-moore-super-spec-hp-d-t-m-alkyd-low-lustre-1-quart/
I ordered it today, so wish me luck!
Emily – reading the description of the link you posted for the paint – it says for metal only. The original BM paint could be used on wood or metal. I’m thinking that anyone who plans to purchase under the new name – be sure to ask if it can be used on wood first.
I just found this on the site http://www.o-geepaint.com. This is in reference to the BM referenced paint. And this was from 2 years ago.
“Also eliminated is Ironclad 163 and Latex Ironclad 363 Low Lustre Wood and Metal enamels. I believe this has more to do with labeling issues than anything else as they have been crossed over to Super Spec HP P23 and P25 respectively. These products are not on the Benjamin Moore website – heck they aren’t even in our new price lists but we’ve cans wrapped in the label.
If you were a fan of the High Gloss Impervo line, all the colors are discontinued out of there as well. That is less of a big deal because the prices had gotten so high on Impervo it won’t sell anyways and the colors were odd, not like they matched anything. Not OSHA and not particularly coordinated with the other products either. There are no substitute colors of course, everything will have to be mixed except it won’t be mixed, customers will have to go to P22 for alkyd gloss readymade reds and yellows or to a different manufacturer entirely.
I really believe that soon alkyds will be gone altogether or there will be consequences for evildoers who paint their wood with the enamels now labeled “for metal only”. Just like the Superbowl advert with the green police arresting the guy with filament light bulbs. Wanna get back at your neighbor? Tell the green police he used solvent laden air pollutin’ oil-base enamel on his 40 year old wood doors. And he prepped them without a lead dust proof barrier, too. Bwaa haa ha haha.”
I know this project is a couple of years old, but boy do I love the outcome! That piece of furniture is beautiful! I was curious what state you live in. In MD and PA you cannot buy oil based paint.
Wow. That’s very interesting. At all?? I live in Michigan. Thank you for stopping by!
I’m pretty sure. LOL 2 years ago I went on a cruise sailing out of Port Canaveral, FL with some friends and we had to stop at a Home Depot down there b/c they sold oil based paint. My friends husband said you could not buy oil based paint in MD or PA (we live right at the line). It’s all about going “green” b/c the clean up and disposal of oil based paint is a PITA. From what I’ve read, BM replaced most of their oil based paints with Alkyds, which is similar to an oil based paint. But after reading that quote that I posted earlier, it looks like they’re going to do away with that too! Interestingly enough, when I Google BM Iron Clad Latex Low Lustre – it still shows up on their website – under that same label.
I wonder if I could have typed “oil based” any more????? LOL
Thanks for the tip going to try it on my end tables!
I’m so bummed 🙁 Talked with a rep from BM – they no longer have a paint for wood (like what you have Chris), so if you still have some, covet it, b/c it is no more. The gentleman said “legally” he could not recommend the new paint for wood – which has me wondering if you can still use the Super Spec P2380 on wood even though is says for metal only. And it definitely varies by state b/c he asked me where I lived. Talk about bursting my bubble! LOL I was so ready to tackle a project with that paint.
@Sabrina – Don’t worry about not being able to find that product anymore! You can go to Home Depot and get the NEW Trim and Door paint by Glidden and it will save you steps. Clean with TSP then use this new gel technology paint with a brush and you will get that factory baked on look you want. Great for Kitchen cabinets, vanities, furniture, trim, doors, etc. Good luck.
I was so excited to try this on my china cabinet but from reading the comments I see this paint is no longer available. 🙁 In your FAQ section you still show this paint also so I was wondering what you recommend instead these days. Thanks!
Any tips on how to clean black furniture? I purchased an amazing black kitchen table but everything I use streaks…?
Thanks for tip about the Zinsser. I’m using it to repaint our kitchen table which actually came from Pottery Barn but is so beat up! Great work.
I am going to give that a try on my mom’s old china cabinet! I will be thrilled if it looks as good as yours!!!
Thanks for the tips!!
I need help with product to use over off white paint to get the tea stained effect. Is it clear glaze that is tinted or a gel stain?
This is beautiful! Might I add though, working in the paint dept at a local hardware store and have had professional training, If you want to make it easier yet, use the Zinsser 123 primer, it is latex and very easy to apply. I generally use 2 coats of it which is not a problem because the drying time is 1 hr. It also sticks to anything and anything sticks to it. The can reccomends 1 coat, but my experience is it goes on a little thin and I look a good thick covorage. I like this better because you are not dealing with oil & the cleanup is with water. Oil base paints, primers also takes longer to dry and I am kind of an impatient person. I have actually used it on vinyl tile in the bathroom 6 years ago and the topcoat of paint is still going strong. When doing furniture, instead of replacing the hardware, another tip is to use Rustoleums Hammered spray paint. You can make hinges, knobs drawer pulls look brand spankin new again for less than $5.00. The hammered paint comes in many colors. The foam rollers you used “ARE THE ONLY WAY TO GO” when doing furniture or doors! Your piece of furniture is gorgeous!:)
Just an add on to my note above,
When your are finished painting your furniture, if you are using a latex paint and you want more of a shine, the minwax polycrylic will make it beautiful. This is also a waterbase and comes in satin, semi-gloss, or gloss. If you need to clean your furniture down the road, a damp cloth is all you need, sometimes I will use the Howard brand bees wax. It is kind of spendy but makes a beautiful shine and also conditions.
I tried this method today on a chest of drawers. All went well, but the foam roller left roller marks on the top surface of the chest. Any idea what I did wrong?
I want to try this; the piece of furniture is FAIRLY smooth already; do I still need primer? Thanks for sharing your fantastic instructions!
thanks for these helping hints. Have you ever used this method on kitchen or bath cupboards??
Verla, I did this same process on my bathroom cabinets, and it’s held up beautifully!
Chris,
What a beauty~ I’m just now beginning to redo a china hutch that I’m turning into a bookcase/display case. What do you suggest for a paint, brand and color, now that the product you used years ago is obsolete? Thanks for any help.
Where you as sad as I was to hear that they no longer make this paint? I was at Sherwin Williams yesterday, and they seem to have a well kept secret. I don’t know why they don’t list this product on their website, and at the store where I live it’s hidden in the back with the deck stain. Maybe because it’s not a “green” or Low VOC product. It is All Surface Enamel and the product description sound exactly like the now obsolete Benjamin Moore Iron Clad enamel. There is a water based (latex) and an oil based version, and they have a Low Sheen black. With their 30% off sale I picked up a quart for around $15. Definitely affordable. I paint ALOT, sometimes that is how I make my living, and have always been pleased with the quality of Sherwin Williams paint with the exception of their new HGTV line. I haven’t started my project yet, but I have to reason to doubt that this product will deliver the results I am looking for. Can’t wait to get started!
Heather, did you have luck with the Sherwin Williams paint you tried? I’m curious to know if it was worth it!
man what a lovely job on the chest….professional look! Nice.
Looking forward to reading more. Great article.Really thank you! Want more.
I bought the recommended products and have finished priming a dresser I am working on. When you have applied this product has the surface been rough after the primer? The dresser feels really rough now and I’m not sure if I should sand it before applying the BM paint or if it will smooth out once painted. Any suggestions?
It will feel rough, Cassie. I would sand it down lightly just to get the gritty feeling smoothed out, but you won’t notice it once the paint is on! Good luck!
That’s gorgeous! I HATE to sand. I think I’ll give this a try on my bedroom furniture. Thanks for sharing.
Gorgeous! Thanks for the tip… love my foam brushes and rollers!!!!
BENJAMIN MOORE PAINT INFO: I live in Virginia and have searched everywhere in my city for this Benjamin Moore paint. Ace, Lowe’s and Home Depot didn’t have it but a local paint store did. The lady at the store explained Benjamin Moore was in the process of changing the label. The gallon (though in the process of being changed) was the same label as mentioned in above post. The quart had changed. I was told they are the EXACT same paint. The “new” name is SUPER SPEC DTM P2580 Black. Hopefully this info will help you all find it. I took the advice of a gentleman above and looked at Benjamin Moore’s website for local retailers. That’s how I found the paint store locally and she informed me they were the only ones to carry it in area. Good luck everyone! (And thanks to Chris for the awesome post! Just what we needed for my soon to be born baby girls bedroom furniture!)
Ok, so you did this almost 3 years ago, so that works out well for my question. I have read around the internet that if you use a latex paint on furniture that you need to coat it with polyurethane to keep the paint job nice. If you don’t want to go through the hassle of doing the poly, than the other option is using oil based paint. How well has this latex held up to use? I’m wanting to paint a heavy usage desk black and I’m wondering what kind of paint I need. Any help would be great! Thanks!
Hello, has anyone tried this in Espresso vs black? Our newer furniture is Espresso and I have several older stained pieces I would LOVE to paint in espresso to match. Has anyone done this using this technique? And would it work on stained pieces that are poly’ed?
Thx!
Nicole
im reading this tutorial and im wondering would it be safe enough to do it on my daughters crib. her room is mismatched and im looking to buy all new furniture because the handy me downs and getting old. everything look brand new but i want it all to match, can i also do this on a dresser that isnt real wood but the compressed stuff??
Would you recommend this for a laminate wood hutch I recently purchased? Thanks! Awesome blogs
I’m thinking about painting my old bunk bends from when I was a kid black for my boys to use today. Scared to try though!! You make it sound so easy though!
Chris,
Great post. I’ve been designing and building furniture for a while now (just built a 94″L x 30″D desktop with a 2″ skirt in black, coated with a high gloss resin for a piano black finish with three brushed aluminum base cabinets).
I’m in the process of painting another desktop I built black. I tried poly-acrylic’s (latex over latex) and no matter how fine a brush I used it always showed streaking. I picked up a gallon of the Benjamin Moore SUPER SPEC DTM P2580 Black, and have been using a 6″ ultra smooth foam roller. I applied the paint, and continued very lightly rolling over it for ~5 minutes, until no lines showed. However, the texture is very rough. I sanded the desktop with a 220, then an ultra-fine 600, wiped it down, waited and applied the BM paint.
Is there anything I am doing wrong? Thanks for your help!
Chris – Thanks so much for sharing this!!! Your furniture and door are GORGEOUS!!! Will be following you for more interesting ideas.
I just went shopping to get all the stuff to do a dresser for my baby-to-be’s nursery… they don’t make the paint anymore =[ So sad! The paint store guy found one can he had left and sold it to me at wholesale(this stuff is PRICEY!) because they don’t make it anymore. They make something similar but it is to be used only on metal. If anyone has found a good alternative, PLEASE post it!!!
Thanks for the tutorial, i can’t wait to get started!
Hi. I was wondering if this has a sticky feeling at all. I have recently redone some bedside tables and used the same “no sand” primer you used. I used Latex paint over that. I mod podged the top with houndstooth paper. It looks great but I am not sure if I need to put a coat of something else on it to protect it but also to eliminate some of the “sticky”. Any suggestions?
I didn’t read all the comments so I don’t know if someone else mentioned it, but on the Zinsser Primer that you used it specifically says “do not use TSP”. Just an fyi, but if it’s working for you then I guess it’s fine!
Looks amazing! I would love to do this to my kitchen cabinets! Do you think it would work? Thanks!
It’s beautiful but wished you would have posted a before pic.
I went out and bought all the stuff that you use and on the back of the can of the primer it says… Do not use T.S.P, so I’m confused because it’s what you said that you used. And I did a wood dresser that was only stained in the past and I didn’t get that smooth look that you show that you got using all these products with the sponge roller. So what did you do that you got that smooth finish that looks like it was boughten brand new?
Hi Chris, I love the look you got on this dresser! I’d like to duplicate what you did but I can’t seem to find the Low Lustre Enamel. May I ask where you purchased it? I even looked on Benjamin Moore’s website and it seems like they don’t make it anymore? Thanks for your help!
The only problem is that it says right on that can of primer to NOT use TSP.
Ok, I am from Ennis, TX… and I searched online and finally found the this paint …. but mine is the DTM…. and I argued with these guys at Texas Paint & Wallpaper they swore it was the same product just a different label…. price was 22.00 quart…. and I am happy to say I bought all the same items as you and finished the first coat earlier…and it is looking good …. do you know what the difference is between the DTM and DVM?
Do you think that this would work on dressers that are not solid wood? I have a beatuiful 1970’s set that was my husbands sisters back in the day. It is a yellow-gold color and wanted to redo but dont want to ruin it. Thanks for any tips!!
I am wanting to paint my husband’s circa 1980’s furniture that has a high gloss finish. I am curious did the piece of furniture that you painted with this pain also have a high gloss to it? I don’t know if it will work with this finish. Thoughts are appreciated.
I did the same thing with primer then paint.It came out sticky and when you put something on table it sticks to it.Help..
Trying this out this weekend. Praying mine comes out as beautiful as yours did. doing a dresser and night stand for my sons room. Thanks for the information.
A couple of other things to look at:
1. After using the TSP, use a piece of TACK Cloth to pick up any particles from the cloth or sponge prior to painting.
2. Another great paint is ACE’s Cabinet and Trim Paint, it is a lot less expensive than Ben-Moore.
3. It is a oil/latex blend and can be tinted to most other paint manufacturers colors by formula or color-matching. Color matching may not be exact.
4. It does take awhile to dry, it can be tacky for up to 72 hrs dependent on the temp/humidity
Hi Chris
I have done everything that you suggested, tsp, primer, and paint, same brand and type, but the finish is rough and not smooth as in your picture. I used foam brushes and rollers and went lighter and lighter and lighter and still end up with little bumps all over my furniture which was smooth as silk before I painted it. I don’t understand. Any thoughts?
About to try this for the first time. . . a little worried about drawers sticking if I don’t sand. . .were you concerned with that?
Thank you so much for all the great tips. I finally found the storage unit I’d been looking for on Saturday and today took off the doors and drawers, removed hardware, and got to work. It looks incredible!
would you use this process and products on kitchen cabinets as well. I read on the can of primer and it said not to use the tps. any thoughts?
thanks,
Ceri
Okay, I bought the exact same kind of roller but my paint is bubbling. When I use a brush it doesn’t bubble, but then it gets streaky. What am I doing wrong?
I AM IN LOVE WITH THIS!!!! I am always painting just took a hutch with lights and shabby chic’ed it!! Thanks for the info beautiful piece!
They have changed the name. It is now called Super Spec HP D.T.M. Acrylic Low Lustre (P25).
I know you have a million thanks already, but let me add……
THANK YOU!!!
I live in an apartment and have no where to do any sanding, so this is perfect for me! I will do this to my daughter’s dresser, then add sheet music and a protective coat over…she is a music major and this is something we’ve planned, but held off due to not knowing how to go about doing it without sanding.
Thank you!! 🙂
I love this! Do you think I would need an additional sealer if I was going to do this on a kitchen table?
Hi,
I just bought an old dresser (shiny wood finish) that I would like to use this technique on, but it has a lot of fairly deep scratches. I have never painted furniture before. If I use wood filler do you think it would come out as beautifully as this did? And is there a filler that you recommend? Also, this will be used daily, so do you think I should put some sort of protective coat on it? If so what kind? Thanks in advance. This piece you did is so beautiful I just had to try it, but I have no idea about this sort of thing. I’m a total newbie!!
Beautiful! Has anyone tried it in white? How does the finish hold up to wear? I do craft shows and have some wooden risers — I have to keep re-painting to cover scratches and tiny chips that occur in transit. I don’t want a glossy finish — want the kind of soft white on a grand piano. Thanks bunches!
So I just falowed all of your directions to a T and it turned out dry and grainy looking 🙁 any ideas?
I fallowed all of your directions and my dresser is now rough and grainy and you can see marks from the roller. It was smooth before. I’ve spent Hours on this. I tried to put polyurethane on a couple of the drawers to see of it would smooth it out but now it looks like shiny black sand paper. How do I fix this??? Thanks